 Warning this page is not encrypted for secure communication. User names, passwords, and any other information will be sent in clear text" width="957" height="711" />
The Central Administration site is a web application where administration activities are performed for the farm. By default, Central Administration runs on non-secure HTTP. Enabling encryption ensures that the communications between users and the central admin website remain secure.
Prerequisite: Of course, You need the SSL certificate! You can use a free domain certificate from an internal CA, but you’ll need a SSL certificate from public certificate authorities for public facing sites.
The steps to secure Central Administration are as follows:
To protect sensitive information, such as credentials, it’s essential to enable SSL on the SharePoint Central Administration site. While it’s a general best practice to safeguard external-facing web applications, it’s also mandatory to encrypt internal communications between the Central Admin site. Otherwise, you will see the following message:
Warning: this page is not encrypted for secure communication. User names, passwords, and any other information will be sent in clear text. For more information, contact your administrator.
Warning this page is not encrypted for secure communication. User names, passwords, and any other information will be sent in clear text" width="957" height="711" />
Also, If you don’t encrypt the SharePoint Central Admin site, you risk passing credentials in the clear text.
Log on to your SharePoint server hosting the SharePoint Central Administration site. By default, the first server you install SharePoint configures Central Administration automatically.
Set-SPCentralAdministration -SecureSocketsLayer -Port 443
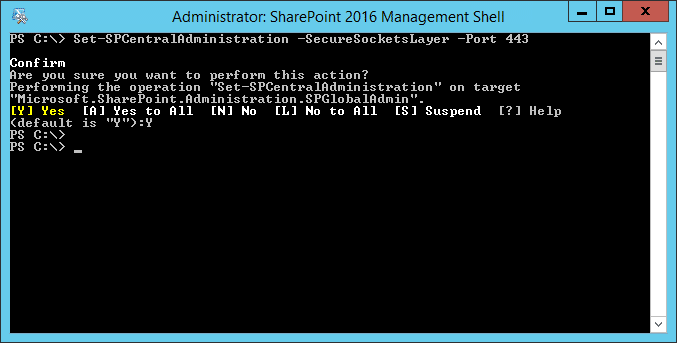
This will reconfigure the SharePoint Central Administration site to use that port with an SSL binding.
Import your SSL certificate to IIS: After getting the certificate from either your internal CA or public CA authority, import the certificate through >> IIS >> Server Certifications >> Import.
Bind the SSL Certificate with the Central Admin Site:
As a next step, You’ll assign the SSL certificate to the SharePoint Central Administration site. Please note, if you do run Central Admin on more than one server, you’ll need to assign the SSL certificate to the web site on each machine.

Visit the site, and ensure that it renders on port 443.
When you set the SharePoint central admin to use SSL, SharePoint 2016 automatically modifies the default AAM to point to the new HTTPS URL. E.g., from https://ca.crescent.com to https://ca.crescent.com. You can verify it once:

In case Central Admin is inaccessible, You can add a new URL to the AAM binding. Run this PowerShell cmd:
New-SPAlternateUrl -WebApplication https://ca-old-url:port -Url https://your-ca-new-url:port -Zone Default